Sushi sandwich

Sushi sandwich

How to make a ‘Sushi Sandwich’?

1.”Break point”

Take a nori sheet, and break it down the middle. If it doesn’t break easily, it’s either old, or not such a good brand of nori to work with. Place the nori sheet on the dry cutting board with the rough side of the nori facing upwards.

2.”The turn over”

Get both your hands wet and make a ball of rice, using about a handful of rice (you can always add more rice later, but drawing out rice is a bit complicated once you’ve put it on the nori). Place the ball of rice in the middle of the nori and start spreading the rice, pressing it down gently, until it is equally spread along the nori sheet. You should now have a 1cm high, equal layer of rice on top of the nori. If needed, add some more rice – just remember to keep it even. Flip the nori over so that the rice is facing the mat and the smooth side of the nori is facing upwards.

3.”The wall”

Yes, a wall. You need to build a “wall of rice” around half the nori as illustrated below. The rice wall needs to be about 2cm wide and 2cm high. Make it higher or shorter depending on the amount of filling you will be using.

4.”Filling”

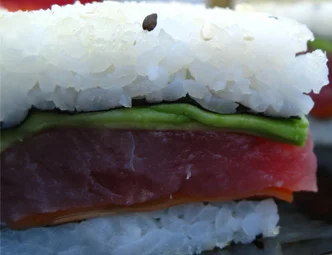
Fill the half nori you just surrounded with a wall with the fillings of your choice. Salmon and avocado makes a classic choice, and was the inspiration for this illustration. You can cut the filling small or big, it doesn’t matter as long as it is evenly spread inside the rice wall.

5.”Close”.

This is the “complicated” part: Hold the end of the nori which is without filling on it, lift, and close it on top of the other end of the nori so it fits exactly on top of the rice wall.

6. “Tightening”

Use a bamboo mat wrapped in saran tape to tighten the “structure” from all directions. In the illustration it shows how to tighten only two sides of it. You’ll need to rotate it 90 degrees and press it on the two other sides.

7. “Cut and serve”

Use a wit knife to cut along both diagonals, and serve with soy sauce, pickled ginger and wasabi.

Enjoy!

How to make Nigiri sushi?

How to make Nigiri sushi?

How to Make nigiri sushi

1.”Shape the rice”

With your hand wet, grab about 20 grams of shari rice, and shape it to a long, oval from. The rice is going to be the base for the fish to lay on, so the bottom should be flat, and the top could be more rounded. The sides should definitely be a bit rounded.

2. “Cut a Slice”

As already mentioned, nigiri sushi topping can vary, but the basic form is “plain” salmon nigiri. So if it is salmon or tuna fish nigiri sushi you are making, the following measurements should be just fine.

Take a slice of fish, about 1 cm thick, 5 cm long and 3 cm wide. If the piece of fish you are cutting from is smaller, and does not allow you to cut such a slice, try slicing it at 45 degrees, it will allow you maximum “fish surface”.

Take a pea-sized portion of wasabi, and smear it along the middle of the fish slice. The wasabi will help the slice glue to the piece of rice, to form a steady nigiri sushi.


3. “Sushitrons – form a nigiri sushi!”

Now it’s time to place the slice of fish, with the wasabi side facing down, on the rice. Lay it gently on the rice, and then press it firmly to stick with the rice. You might want to use the other hand to hold the nigiri sushi from the sides while pressing it from above, to avoid “rice loss”.

“So, how can I start…?”

Well, the best thing is to get sushi equipment and ingredients to start with. Check out our sushi e-Store, for sushi kits and more. You might also want to know how to prepare sushi rice, or to read more about sushi grade fish for your sushi roll.

Enjoy!

All_sorts_of_nigiri

Inside out sushi rolls

Inside out sushi rolls

About inside out sushi

The inside out sushi roll (or Uramaki, 裏巻), is more common in the west than in Japan and is very popular in western sushi bars.

What makes the inside out roll unique is the fact that the sushi rice is in the outside and the nori is on the inside, wrapping the filling. Having the rice out and the nori in is what makes a sushi roll “inside out”.

how to make inside out sushi

Wrapping the rolling mat

Hoping you are using the “one side round and one side flat” rolling mat. A different kind of rolling mat has both sides round – I find the results of the second kind less impressive. Cover the rolling mat with a plastic wrap starting with the round side, and ending with it. Make about 2-3 full rounds of wrapping.

After you are done wrapping, roll the mat to squeeze out all the air locked inside the wrapping. If needed – poke it with a toothpick to let the air out.

Break point

Take a nori sheet, and break it down the middle. If it does not break easily it might mean the nori is old and may have soaked in humidity. You can toast it over a flame until crisp again.

Place the nori sheet on the rolling mat abut 5 cm from the edge, with the rough side of the nori facing upwards. This is a good brand of nori to use.

The turn over

Get both your hands wet and make a ball of rice, using a handful of rice (you can always add more rice later, but drawing out rice is a bit complicated once you’ve put it on the nori). Place the ball of rice in the middle of the nori and start spreading the rice, pressing it down gently, until it is equally spread along the nori sheet.

You should now have a 1 cm high, equal layer of rice on top of the nori. If needed, add some more rice – just remember to keep it even. Flip the nori over so that the rice is facing the mat and the smooth side of the nori is facing upwards.

Can you fill this?

Now it’s time to place a slice of fish (preferably no more than one) on the edge of the nori, along with 1-3 pre-cut slices of vegetables (carrot, cucumber, green onion, asparagus, and so on.. allow yourself to get wild on this matter)..

5.”Commence the rolling sequence”

Using the closer edge of the rolling mat, close the nori around the filling – making a rectangular shaped hill and tighten it from above.

Continue the rolling sequence

Move forward, continue rolling in the rectangular hill steps, keeping it tight with every move until you reach the end of the nori.

Put pressure on the roll from all three sides at all time, especially on stops to allow it to roll tightly.

And… cut!

Use a wet, sharp knife to cut the roll in to little sushi units. 6-8 units per roll – that’s your call.

Some folks cut off the ends of the sushi roll and throw it away assuming it is less presentable. If you ask me that’s a huge waste, but that is entirely your call.

“So, how can I start…?”

Well, the best thing is to get a rolling mat and nori. For more sushi equipment and ingredients to start with – Check out our sushi e-Store, for sushi kits and more.

You might also want to know how to prepare sushi rice, or to read more about sushi grade fish for your sushi roll.

insideOutSushi

Making maki sushi

Making maki sushi

How to make maki sushi?

Welcome! This guide will walk you through the steps of making a your first maki sushi roll. We also have a salmon maki recipe with guided steps and pictures here.

1. “The rough side of the nori”

Feel the nori sheet from both sides and you will find one side to be a bit smooth and the other a little rough. The nori should lay on the rolling mat with the rough side facing upwards.

2. “Getting busy with rice”

Get your hands wet, and make about a handful of rice to a ball of rice. It’s important to keep your hands wet while working with sushi rice because it is sticky. When you work with the nori though, you should keep them as dry as you can. That is why you should have a bowl of water (with a bit of rice vinegar added to it) and a dry hand-towel nearby when making sushi.

3. “The spread”

Gently put the rice ball in the middle of the nori sheet, and start spreading it equally on the nori, creating a layer of rice covering almost the entire sheet except the upper margin of about 2 cm that should be kept uncovered. Later on, the margins need to be empty of rice in order to close to sushi roll properly. Be careful not to compress the rice, but merely spread it over the nori.

4. “Can you fill this?”

Let’s lay down the roll filling, for example a slice of sushi grade tuna, on the edge of the nori. You can add a slice or two of vegetables, you might want to use a long slice of avocado or maybe cucumber for this especially on stops to allow it to roll tightly.

5. “Commence the rolling sequence”

Using the closer edge of the rolling mat, close on the filling with the nori making a rectangular shaped hill and tighten it from above.

6. “Continue the rolling sequence”

Move forward, continue rolling in the rectangular hill steps, keeping it tight with every move until you reach the end of the nori. Put pressure on the roll from all three sides at all time, especially on stops to allow it to roll tightly. Make sure you tighten the roll moving from the ends to the center. Be careful not to squeeze out the roll filling.

7. “And….cut!”

Use a wet, sharp knife to cut the roll in to little sushi units. 6-8 units per roll – that’s your call. It is useful to keep the knife wet when in between, that helps cutting through the rice and nori.

8. “So, how can I start…?”

Well, the best thing is to get sushi equipment and ingredients to start with. You can probably everything you need your local asian food store. If you’d like to browse for ingredient and accessories online, check out our sushi e-Store, for sushi kits and more. You might also want to know how to prepare sushi rice, or to read more about sushi grade fish for your sushi roll.