

Sushi cutting patterns are about precision, artistry, and the right tools. The way you slice sushi doesn’t just affect its appearance but also its texture and taste. Whether you’re preparing simple rolls or aiming for complex designs, mastering these techniques can elevate your sushi game.
Key Takeaways:
- Precision is crucial: Clean cuts preserve texture and visual appeal.
- Essential tools: Use sharp knives like the Yanagiba, Usuba, and Deba for specific tasks.
- Techniques matter: Straight cuts, diagonal cuts, and advanced methods like Usuzukuri create stunning results.
- Ingredient placement: Strategic arrangement ensures beautiful patterns in every slice.
- Knife care: Keep blades sharp, clean, and properly stored to maintain performance.
With practice and the right equipment, you can create sushi that looks as good as it tastes. Start with basic techniques and gradually explore advanced methods to hone your skills.
Cutting Nori in Patterns – Sushi Cooking Ideas #2
Tools You Need for Precise Sushi Cutting
The right tools can elevate sushi preparation into a true art form. Sushi knives and equipment are crafted with precision, blending tradition and functionality to meet the unique demands of sushi-making.
Key Knives for Sushi Cutting
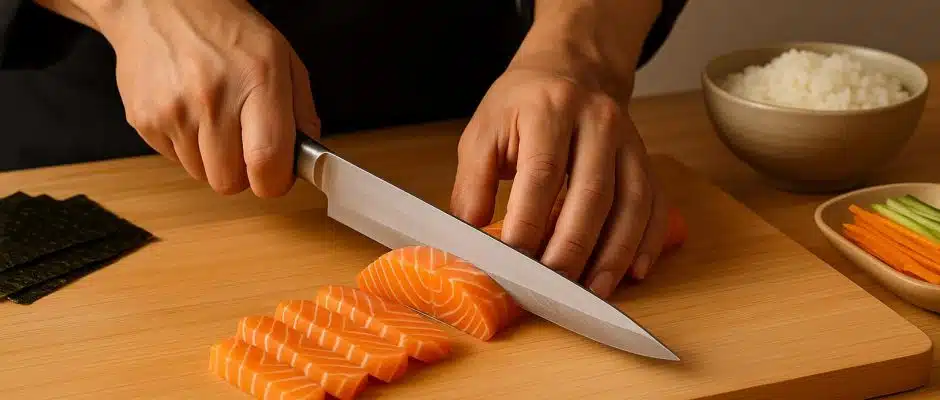
The Yanagiba is the go-to knife for cutting sushi with precision. Its long, slender blade is perfect for slicing sashimi and sushi rolls in a single, seamless motion. Thanks to its single-bevel edge and razor-sharp design, it minimizes damage to delicate fish, preserving both its texture and visual appeal. The extended blade ensures each cut is smooth and clean.
For working with vegetables, the Usuba is indispensable. Its flat, thin blade is ideal for intricate cuts and garnishes. Whether you’re performing katsuramuki (thinly peeling vegetables) or creating julienne strips for decoration, this knife delivers consistent precision every time.
The Deba, on the other hand, is designed for heavier tasks. With its thick, sturdy blade, it’s perfect for filleting whole fish and removing bones. This knife is often used to break down sushi-grade fish before switching to the Yanagiba for the final, delicate slices. Its weight and stability provide the control needed to handle fish without damaging the flesh.
These three knives form the backbone of sushi preparation, each serving a specific role to ensure flawless results.
Additional Tools for Perfect Cuts
A good cutting board is just as important as the knives. Wooden boards are highly recommended because they are gentle on knife edges and provide the stability needed for precise slicing. High-quality plastic boards can also work, but avoid hard surfaces like glass or ceramic, as they can dull your blades quickly.
Keeping your blade clean during use is another key step. A damp towel is essential for wiping the blade between cuts, removing any rice grains or fish oils that might stick. This simple habit ensures each slice is clean and precise, preserving the integrity of your sushi.
To maintain your knives’ sharpness, a quality whetstone is a must. Regular sharpening keeps your blades performing at their best, which is crucial for intricate cutting techniques. Professional sushi chefs often sharpen their knives frequently to achieve the precision required for their craft.
For those aiming for uniformity in their sushi pieces, slicing guides or rulers can be helpful. These tools are especially useful when creating complex patterns that demand consistent sizes and shapes.
Why Sharp Blades Matter
A sharp knife is the cornerstone of successful sushi cutting. It glides effortlessly through ingredients, avoiding the crushing of rice, tearing of nori, or shredding of fish. This precision is especially critical for intricate patterns, where a dull blade can leave jagged edges that ruin the visual appeal of your sushi.
Using a dull knife not only compromises the look of your sushi but also requires more force, which can compress the roll and distort its internal design. It also increases the risk of accidents. In contrast, a sharp blade offers control and precision with minimal effort, making it easier to achieve the delicate cuts sushi demands.
Maintaining sharp knives goes beyond regular sharpening. Cleaning and storing them properly is just as important. Protective sheaths or magnetic strips can prevent edge damage, while immediate cleaning after use helps avoid residue buildup that could affect performance.
For those starting out, Make My Sushi (https://makemysushi.com) provides sushi-making kits that include essential knives and detailed maintenance guides, making it easier to master the art of sushi cutting at home.
Techniques for Creating Detailed Sushi Patterns
Creating intricate sushi patterns starts with mastering both basic and advanced cutting techniques. The secret lies in precise knife control and understanding how each cut influences the final presentation.
Basic Cutting Methods
Straight cuts are the foundation of all sushi slicing techniques. To execute this, hold your knife perpendicular to the cutting board and make a smooth, downward motion. This technique is ideal for standard maki rolls, ensuring clean, even slices that clearly showcase the roll’s interior.
Diagonal cuts bring a touch of flair by creating oval-shaped pieces instead of perfect circles. By slicing at a 45-degree angle, you expose more of the roll’s interior, making this method perfect for thicker rolls like futomaki. The result is an elegant and visually striking presentation.
Pull-cuts involve drawing the knife toward you with steady, gentle pressure. Start with the tip of the blade touching the roll, then pull through in one smooth motion. This technique is especially useful for rolls with delicate ingredients, like soft fish or tender vegetables, as it prevents crushing and ensures clean edges.
For beginners, practicing these basic cuts on softer vegetables like cucumbers is a great way to develop steady knife control and precision before moving on to more challenging ingredients. Once you’ve mastered these, you can explore advanced techniques to create even more intricate patterns.
Advanced Techniques for Detailed Patterns
Advanced cutting techniques take sushi presentation to a whole new level, transforming simple rolls into works of art.
Hirazukuri produces flat slices about 0.4 inches thick and 3 inches long, making it the go-to cut for robust fish like tuna and salmon. To achieve this, position your knife at a 90-degree angle to the fish and slice straight down with confidence.
Sogizukuri creates wider, more elegant slices by cutting at a 45-degree angle. This technique works beautifully with white-meat fish like snapper, as the angled cut enhances the fish’s delicate appearance by exposing more surface area.
Usuzukuri demands exceptional skill to create paper-thin slices, ranging from 0.04 to 0.08 inches thick. This technique is often used for white fish, producing translucent pieces that practically melt in your mouth. Consistent pressure and a smooth slicing motion are key to mastering this method.
Katsuramuki involves peeling vegetables into continuous, paper-thin sheets. Hold the vegetable firmly and rotate it against the blade to create these delicate sheets, which can be used for wrapping or decorative plating.
| Cutting Technique | Description | Best For |
|---|---|---|
| Hirazukuri | Flat slices, 0.4 inches thick, 3 inches long | Robust fish like tuna and salmon |
| Sogizukuri | 45-degree angled slices | White-meat fish like snapper |
| Usuzukuri | Paper-thin slices (0.04–0.08 inches) | Translucent cuts for white fish |
| Katsuramuki | Rotary peeling for thin sheets | Wrapping or decorative plating |
"Kazarigiri is not just about creating beautiful food, but it’s also about respecting the natural beauty of the ingredients and presenting them in a way that elevates their flavor and texture." – Chef Hiroki Sakai
How Ingredient Placement Affects Patterns
The arrangement of ingredients within a sushi roll plays a huge role in the final pattern revealed by your cuts. Strategic placement of colorful vegetables, fish, and other components creates a visual story with each slice.
Think of the roll as a canvas where every ingredient adds to the overall design. Placing contrasting colors – like bright orange carrots next to deep green cucumber or vibrant red tuna paired with white rice – creates bold and eye-catching patterns. Careful planning also ensures a balance of flavors, textures, and colors.
For consistent patterns, symmetrical placement works best. Arrange ingredients at regular intervals around the roll’s circumference so each slice reveals a uniform design, perfect for formal presentations. If you’re looking for something more dynamic, try asymmetrical placement. Clustering ingredients on one side or arranging them in a spiral can create a unique and artistic effect.
The texture and thickness of ingredients also matter. Thin, flexible items like cucumber or avocado can be shaped and positioned with precision, while firmer ingredients like cooked shrimp or tempura provide structure and bold focal points. By considering the natural characteristics of each ingredient, you can better predict and control the final visual outcome.
Carefully intertwining components not only creates a stunning presentation but also enhances the dining experience, showcasing the quality of the ingredients and the thoughtfulness behind their preparation.
sbb-itb-7b591fe
Step-by-Step Guide to Cutting and Revealing Patterns
Creating intricate sushi patterns requires a mix of preparation and precision. The final result – whether it wows or disappoints – often depends on following the right steps in the right order.
Preparing the Roll for Cutting
Start by cooling the roll for about 15–20 minutes. This helps firm up the rice and keeps the ingredients stable.
Next, loosely wrap the roll in plastic wrap or a damp paper towel (if using nori) and place it seam-side down on a clean, spacious cutting board. Before you begin slicing, take a moment to visually inspect the roll. Look for spots where the ingredients are evenly distributed, avoiding areas that seem too sparse or overly packed. This ensures every slice showcases the desired design.
These steps are essential for setting the roll up for precise cutting and maintaining its pattern.
Techniques for Slicing Without Distortion
Once the roll is prepped, the key to cutting cleanly lies in your technique.
- Use one smooth, decisive motion for each cut. Avoid sawing back and forth, as this can ruin the roll’s shape. Position your knife where you want to cut, and slice in a fluid motion that takes about 2–3 seconds.
- To ensure uniform slices, lightly mark the roll before cutting. Use the tip of your knife to score the surface at even intervals. For a typical maki roll, aim for slices that are about 0.75–1 inch thick – especially important if you’re preparing a presentation platter.
- Keep your knife vertical and start at the top of the roll, slicing down in one steady motion. Apply only minimal pressure; a sharp knife should do most of the work without compressing the roll.
Cleaning the Knife Between Cuts
A clean knife is crucial for maintaining precision and preventing flavors from mixing.
Rinse the blade under warm water after each cut, then dry it immediately with a lint-free towel. If any residue builds up, quickly rinse and dry again. This is especially important when switching between rolls with different fillings, as it prevents flavor transfer and keeps cuts clean.
Once you’re finished, wash the knife with mild dish soap and warm water. Rinse thoroughly and dry completely before storing it. Keeping your knife clean not only ensures better performance but also helps maintain its sharpness and accuracy over time.
Troubleshooting and Best Practices
Even experienced sushi chefs encounter challenges when slicing rolls. Using the right techniques can help you achieve smoother, more precise cuts.
Common Cutting Problems and Solutions
Ragged edges are often caused by a dull knife or applying too much pressure. A dull blade crushes the rice instead of slicing cleanly, leaving the roll looking uneven. To prevent this, sharpen your knife regularly and let the blade glide effortlessly through the roll.
Compressed rolls happen when you press down too hard while cutting. This can flatten the roll and disrupt the placement of the ingredients. Use a gentle, steady slicing motion instead. If rolls are still compressing, they may be overfilled or not sealed tightly enough before slicing.
Rice sticking to the blade can make cuts messy and pull grains out of the roll. To avoid this, dip your knife in water before slicing and wipe it with a damp towel periodically.
Uneven slice thickness stems from inconsistent technique or rushing. Focus on making each cut in one smooth, fluid motion to ensure uniform slices that look polished.
Ingredients falling out during slicing usually means the roll is either overfilled or not sealed properly. Keep your filling amounts manageable and ensure the roll is tightly wrapped to maintain its structure.
Tackling these issues is key to achieving clean, precise cuts and ensuring safety while working.
Safety Tips for Sushi Cutting
Beyond troubleshooting, safety should always be a priority. Keeping your tools sharp, as mentioned earlier, is essential for avoiding accidents.
Sushi Chef Sushi Rik stresses the importance of immediate knife care:
"As soon as I finish cutting, I rinse my knife under warm water. Waiting is not an option because food residue can corrode the blade."
Proper knife storage is equally important. Avoid tossing knives into a drawer where they can get damaged or cause injuries. Instead, use a knife block, magnetic strip, or knife roll to keep blades protected and accessible.
Choose the right cutting surface. Wooden or plastic cutting boards are ideal, providing stability without wearing down the knife’s edge. Avoid hard materials like glass or marble, which can dull the blade and increase the risk of slipping.
Pay attention to hand positioning. Use a claw grip with your non-cutting hand, keeping your fingertips tucked under to guide the roll safely while cutting.
After slicing, rinse the blade right away, dry it thoroughly with a soft cloth, and store it properly. As Sushi Rik advises:
"Never soak your knife in water, even for a few minutes. Even stainless steel cannot withstand prolonged contact with water."
Conclusion and Key Takeaways
Creating stunning sushi patterns relies on sharp tools, precise techniques, and careful preparation. A razor-sharp knife is essential – it glides effortlessly through sushi rolls, preserving the intricate designs within.
Take the Sogizukuri technique, for example. This slanted slicing method not only increases the surface area of each piece but also highlights the internal patterns in a more visually appealing way. Pairing this method with cuts made against the grain enhances both the texture and the presentation of your sushi. When combined with intentional ingredient placement, the results can be truly eye-catching.
As discussed earlier, arranging ingredients thoughtfully is key. Symmetry in the placement of fish and vegetables ensures that each slice reveals a striking design. A classic example is the chrysanthemum pattern, where ingredients are centered to create a flower-like appearance in every piece.
For clean and precise cuts, use a single, fluid motion – avoid sawing – and keep your blade clean between slices to maintain the clarity of each pattern.
Thanks to the growing popularity of making sushi at home, these techniques are easier to learn than ever. Resources like Make My Sushi provide step-by-step guides that simplify even complex patterns, helping you achieve professional-quality results in your own kitchen.
Start with the basics before moving on to more intricate designs. With practice, you’ll build muscle memory and gain a deeper understanding of how your knife interacts with the ingredients.
With the right tools, proper techniques, and consistent practice, you can create sushi patterns that look as impressive as those served in high-end restaurants. Dedication and attention to detail will help you consistently craft beautiful, professional-looking sushi.
FAQs
What knives are essential for sushi cutting, and how are they used differently?
The Yanagiba and Deba knives are must-haves for sushi-making, each crafted for specific tasks. The Yanagiba, with its long and slender blade, is perfect for slicing raw fish and sashimi. Its design allows for precise, smooth cuts in a single forward motion, preserving the fish’s delicate texture.
In contrast, the Deba is a robust, heavier knife made for tougher jobs. It’s ideal for filleting fish and cutting through bones or cartilage with ease. While the Yanagiba focuses on precision and finesse, the Deba is all about strength and durability. Together, they form the backbone of tools needed to prepare exceptional sushi and sashimi at home.
What’s the best way to slice sushi rolls without ruining their shape or design?
To keep your sushi rolls neatly intact and preserve their beautiful design, it’s essential to chill the rolls thoroughly before slicing. This helps the ingredients stay firmly together, reducing the chance of them falling apart.
When it’s time to cut, use a sharp knife and lightly dampen the blade with water. This ensures smooth, clean slices. Instead of pressing straight down, use a gentle sawing motion – this reduces pressure on the roll and helps maintain those intricate patterns.
What mistakes should I avoid when cutting sushi rolls with intricate patterns?
When slicing sushi rolls with intricate designs, using a dull knife is a mistake that can completely ruin your efforts. A blunt blade tends to crush the rice and fish, making it impossible to achieve those clean, precise cuts. To avoid this, always ensure your knife is sharp and ready for the task.
Another common oversight is forgetting to wet the knife before each cut. This simple trick keeps the blade from sticking to the rice and fish, preserving the roll’s appearance. Also, be mindful of how much pressure you apply. Pressing too hard or overhandling the roll can distort the design you’ve worked so hard to create. Instead, aim for gentle, steady motions to keep everything looking sharp and intact.
No comments yet.