

Making inside-out rolls, or uramaki, at home is simpler than you might think. These sushi rolls, with rice on the outside and nori tucked inside, originated in Los Angeles during the 1960s. They’re beginner-friendly and allow for endless filling and topping combinations, from seafood to vegetarian options. Here’s a quick summary of what you’ll need and the steps to follow:
What You’ll Need:
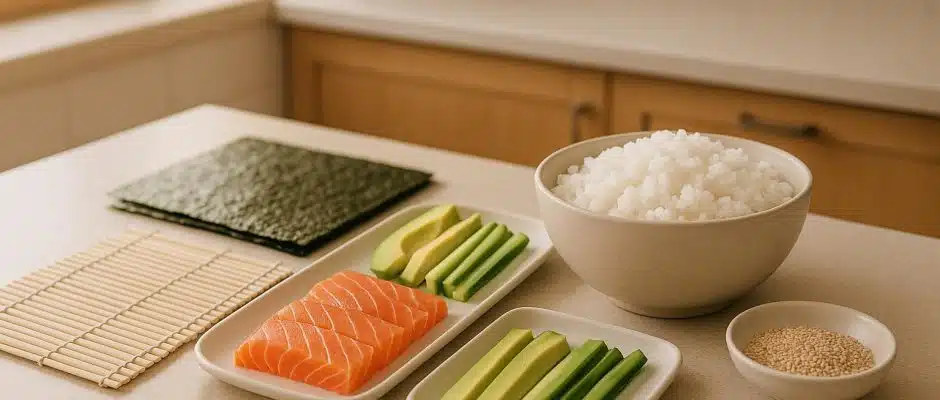
- Ingredients: Sushi rice, nori sheets, fillings (like avocado, cucumber, crab, or fish), and toppings (sesame seeds, fish roe, etc.).
- Tools: Bamboo mat wrapped in plastic, sharp knife, rice paddle, and small bowls of water.
Steps to Follow:
- Prepare the Rice: Use Japanese short-grain rice, rinse thoroughly, cook, and season with sushi vinegar.
- Set Up the Nori and Bamboo Mat: Cut nori sheets to size and wrap your bamboo mat in plastic wrap.
- Assemble and Roll: Spread rice on the nori, flip it, add fillings, and roll using the bamboo mat.
- Slice and Serve: Use a sharp, wet knife for clean cuts and serve with soy sauce, wasabi, and pickled ginger.
Key Tips:
- Keep your hands wet to prevent rice from sticking.
- Avoid overfilling for easier rolling.
- Use high-quality ingredients for the best flavor and presentation.
With some practice and the right preparation, you can create sushi rolls that look and taste amazing. The process is fun, and experimenting with different fillings and toppings can help you find your favorite combinations.
How To Make Uramaki Sushi (INSIDE-OUT ROLL) with The Sushi Man
Required Ingredients for Inside-Out Rolls
To craft perfect Uramaki, you’ll need the right ingredients to ensure the proper texture, flavor, and structure. Here’s what you’ll need:
Sushi Rice
Japanese short-grain white rice is the gold standard for sushi because of its stickiness and firm texture.
"With a higher moisture content than other varieties, Japanese rice has the slight stickiness and signature firm texture you want for sushi. I strongly discourage using long-grain rice, jasmine rice, brown rice, or other varieties, as your sushi will fall apart." – Namiko Hirasawa Chen, Just One Cookbook
If Japanese rice isn’t available, Korean rice can work as a substitute since it shares similar qualities. For each roll, you’ll need about ¾ cup (110 g) of cooked sushi rice. To prepare it, use a 1:1 water-to-rice ratio, rinse the rice thoroughly, and let it soak for 20–30 minutes before cooking. Once cooked, season the hot rice with sushi vinegar using a slicing motion, then cool it quickly for the best results.
Nori Sheets
Nori, or dried seaweed sheets, forms the inner layer of an inside-out roll. Because the rice covers the outside, you might need to trim the nori sheets to match your desired roll size. Always use fresh, crisp nori to maintain the roll’s structure and avoid sogginess when it contacts the rice.
Fillings and Toppings
Common fillings include avocado, cucumber, crab (or imitation crab), and sushi-grade fish. For toppings, you can use sesame seeds, fish roe, thin slices of fish, crunchy onions, or spicy mayo. Toasted sesame seeds add a nutty flavor, while crunchy toppings balance softer fillings. Popular combinations include smoked salmon with cream cheese or vegan-friendly options like avocado and cucumber. Cutting fillings into thin strips makes them easier to roll, and adding spring onions can provide a refreshing contrast.
Serving Condiments
Pair your rolls with soy sauce, wasabi, and pickled ginger. Soy sauce is available in light and dark varieties, while ponzu can offer a citrusy alternative. For extra heat, some enjoy hot mustard sauce or chili oil. Use wasabi sparingly – it’s potent – and let pickled ginger cleanse your palate between bites. To round out the meal, consider a bowl of warm miso soup or a cup of green tea, which is not only soothing but also known for its antibacterial properties.
Needed Tools and Equipment
Having the right tools on hand is just as important as using top-quality ingredients. The right equipment can turn a frustrating experience with sticky rice into a smooth process that results in professional-looking inside-out rolls. The good news? You don’t need to break the bank – just a few essentials will do the trick.
Bamboo Mat with Plastic Wrap
The bamboo mat, or makisu, is your go-to tool for rolling sushi. If you don’t have one, a clean tea towel can work as a substitute. However, the key to success is wrapping your bamboo mat in plastic wrap. This step keeps your mat clean and prevents rice from sticking in the gaps between the bamboo slats. Plus, the plastic wrap helps lock in moisture, making the nori softer and easier to handle.
To use, cover the bamboo mat with plastic wrap, lay the nori on top, and spread the rice evenly. When rolling, lift the edge of the mat with your thumbs while curving your fingers over the top. Gently press along the length of the roll, pulling the edge toward you for a smooth, continuous motion.
Sharp Knife
A sharp knife is non-negotiable for achieving clean, precise cuts. A dull blade can tear the roll and leave you with uneven slices. Some great knife options include Yanagi knives (ideal for slicing fish), Gyuto knives (perfect for cutting rolls), and Sujihiki knives, which function like carving knives and are easier to maintain than traditional single-bevel Japanese knives.
Before each cut, wet the knife blade to prevent sticking. Use a smooth slicing motion, and clean the blade between cuts with a damp towel or a mix of water and rice vinegar for the best results.
Rice Paddle and Small Bowls of Water
Once you’ve rolled your sushi, handling the rice properly is key to bringing everything together. A rice paddle, or shamoji, is perfect for evenly spreading rice without crushing the grains. Its flat, wide surface applies gentle pressure, and wooden or bamboo paddles are less sticky compared to metal utensils.
Keep a bowl of water nearby to wet your hands as you work. This prevents rice from sticking to your fingers. Dip your hands frequently while spreading the rice and shaping your rolls for a seamless process.
sbb-itb-7b591fe
Step-by-Step Preparation Checklist
Ready to make restaurant-style inside-out rolls at home? With your ingredients and tools in place, follow these steps to turn your kitchen into a sushi-making workshop. Each step builds on the last, so take your time and enjoy the process.
Prepare Sushi Rice
Start with Japanese short-grain white rice for the best texture and flavor. Rinse the rice under cold water until the water runs clear to wash away excess starch. Cook the rice using your preferred method – whether that’s a rice cooker, Instant Pot, or stovetop.
While the rice is still hot, gently fold in a mixture of rice vinegar, sugar, and salt. The heat helps the rice absorb the seasoning more effectively. Next, spread the rice out in a wide bowl to cool it quickly, folding and fanning it as you go. This technique creates that glossy, professional look. Use a slicing motion to mix, avoiding any mashing of the grains. Cover the rice with a damp cloth to keep it moist while you prepare the other components.
Prepare Nori and Bamboo Mat
Take standard nori sheets (about 7 inches × 8 inches) and cut them in half along the longer side, creating pieces roughly 7 inches × 4 inches each.
Wrap your bamboo mat in plastic wrap to prevent sticking and make cleanup a breeze. Place a half-sheet of nori on the plastic-covered mat, with the rough side facing up and the longest edge closest to you. This setup ensures the rice sticks properly when you start assembling.
Assemble and Roll
Before handling the rice, wet your hands with water to prevent it from sticking. Spread about ¾ cup of sushi rice evenly over the nori, creating a thin layer that just covers the sheet. Sprinkle sesame seeds or tobiko over the rice for added texture and flavor.
Carefully flip the nori sheet so the rice faces down, touching the plastic wrap on the bamboo mat. Add your chosen fillings in a straight line across the center of the nori, keeping them about an inch away from the edge closest to you. Using your thumbs, lift the edge of the bamboo mat and roll it over the fillings, applying firm but gentle pressure. Continue rolling while shaping and compressing the roll with the mat.
Slice and Serve
Once your roll is formed, it’s time to slice and serve. Wet a sharp knife with water or a mix of water and rice vinegar to keep the rice from sticking. Use a smooth, sawing motion to cut the roll into neat pieces, cleaning the knife between each cut.
Slice the roll into 6–8 pieces, depending on your preferred size, and arrange them on a serving plate. Serve immediately with soy sauce, wasabi, and pickled ginger on the side. Inside-out rolls are best enjoyed fresh, while the nori retains its texture and the rice is at room temperature. Bon appétit!
Tips for Better Inside-Out Rolls
Perfecting inside-out rolls at home takes some practice, but with the right techniques, you can create rolls that rival those from your favorite sushi spot. These tips tackle common challenges and help you achieve impressive results.
Avoid Overfilling
When it comes to filling inside-out rolls, less is definitely more. Leave about an inch of space around the edges, and cut your fillings into thin, even strips. This ensures a balanced bite every time.
Once you’ve rolled your sushi, wrapping it in cling wrap can make a big difference. It helps tighten the roll and makes slicing much easier. This simple step keeps everything intact and gives you neat, professional-looking pieces.
Use Quality Ingredients
The quality of your ingredients can make or break your rolls. Start with premium sushi rice and season it properly with sushi vinegar. Cook the rice about two hours before assembling your rolls so it has time to cool to room temperature. This step is key for getting the right texture and making the rice easier to handle.
To keep your rice from drying out, cover it with a damp tea towel while you work. As for nori, choose fresh sheets that are crisp and have a deep green color. If the nori feels soft or chewy, it might be too old and could complicate the rolling process.
For the fillings, freshness is non-negotiable. Opt for the best fish and vegetables you can find. If you’re using raw fish, make sure it’s sushi-grade and purchased from a trusted source. High-quality ingredients not only improve the flavor but also ensure food safety.
Practice Rolling Technique
Even with great ingredients, your rolling technique is what brings it all together. Consistent pressure and proper hand placement are key to creating tight, uniform rolls. One of the biggest hurdles for beginners is dealing with sticky rice, but there’s an easy fix.
"Sushi rice sticks to everything including your hands. This can make the rolling process difficult. However, if you keep a small bowl of water nearby and continually moisten your hands, you’ll find the rice doesn’t stick to you." – Shogun Japanese Steakhouse
Keep a bowl of water or a vinegar-water mix nearby to keep your hands and tools from sticking. Apply steady, firm pressure as you roll, and when it’s time to slice, use a sharp knife dipped in water. A smooth, continuous sawing motion works best. Don’t forget to clean the knife frequently to prevent rice buildup, which can tear the nori and lead to uneven pieces.
Conclusion
Making inside-out rolls at home becomes much easier when you follow a well-organized plan. Preparation is everything – having your sushi rice perfectly seasoned and cooled, fresh nori sheets ready to go, and all your fillings prepped ahead of time sets you up for success. Pair that with the right tools, like a plastic-wrapped bamboo mat and a sharp knife, and you’re already on track to create sushi that rivals your favorite restaurant.
The secret to great sushi lies in the ingredients. Fresh nori, expertly seasoned sushi rice, and high-quality fillings make all the difference. Since sushi rice is the foundation of every roll, spending time to perfect your rice-making skills will reward you with better-tasting results every time.
Rolling sushi takes practice, and with each attempt, your technique will improve. Even seasoned sushi chefs have spent years honing their craft, so don’t be discouraged if your first rolls aren’t perfect. Trying out different fillings and toppings not only keeps things exciting but also helps you find your favorite combinations while boosting your confidence in the process.
The key to mastering sushi is consistent practice and a willingness to experiment. For even more guidance, explore the step-by-step tutorials and resources available on Make My Sushi. From basic techniques to advanced rolling methods, their guides cover everything you need, including tips on sourcing sushi-grade fish and choosing the best tools for your kitchen. By reviewing your process after each attempt, you’ll progress faster and enjoy the journey of perfecting your homemade sushi. Whether you’re refining your inside-out rolls or branching out into new styles, these resources will inspire and support your sushi-making adventures.
FAQs
What are the most common mistakes to avoid when making inside-out sushi rolls at home?
When making inside-out rolls (Uramaki) at home, a few common missteps can lead to rolls that don’t quite hit the mark. One frequent issue is overfilling the roll. Adding too much filling makes it tricky to roll tightly and often results in the roll falling apart. The fix? Keep the filling modest and spread it evenly across the nori.
Another challenge comes from improperly handling the nori (seaweed). If it’s too dry, it can crack or fail to stick to the rice. A simple solution is to lightly moisten the edges with water, which helps seal the roll securely. Also, don’t overlook the importance of rinsing your rice thoroughly before cooking. This step removes excess starch, ensuring the rice has the right texture for rolling.
Finally, technique matters. When rolling, apply gentle yet firm pressure – enough to keep everything compact without squashing the ingredients. By focusing on these details and practicing a bit, you’ll soon be crafting inside-out rolls like a pro!
How do I prepare sushi rice with the perfect texture and flavor for inside-out rolls?
To make sushi rice with the perfect texture and flavor for inside-out rolls, start by rinsing the rice under cold water. Keep rinsing until the water runs clear – this step removes extra starch so the rice doesn’t turn overly sticky. For cooking, use the standard ratio of 1 cup of rice to 1 1/4 cups of water to achieve a soft, slightly sticky consistency.
After the rice is cooked, season it while still warm. Mix rice vinegar, sugar, and salt, then gently fold this seasoning into the rice. Be careful not to mash the grains as you mix; the goal is to coat the rice evenly. Allow the rice to cool to room temperature before using it. Properly prepared sushi rice should hold together easily without being mushy, making it just right for rolling inside-out sushi.
What are some creative fillings and toppings I can use for inside-out rolls at home?
If you’re ready to experiment with your inside-out rolls, there are so many tasty filling and topping ideas to explore! Classic fillings include avocado, cucumber, cream cheese, smoked salmon, shrimp, and thin slices of raw fish like salmon or tuna. Want to mix it up? Try adding mango for a touch of sweetness or a drizzle of spicy mayo or sriracha for a kick of heat.
To take your rolls to the next level, consider toppings like sesame seeds, fish roe (such as tobiko or ikura), jalapeño slices, radish, cilantro, or a sprinkle of furikake for extra flavor and crunch. Play around with different combinations to discover your new go-to roll!
No comments yet.