Introduction:
The transition from rice preparation to sushi rolling is notoriously messy and time-consuming, often slowing down home chefs and taking a chunk of the fun out of the sushi-making process. But what if there was a way to bypass the sticky fingers and scattered ingredients? Enter the baking paper method—a quick, clean, and efficient way to prepare sushi at home. This technique ensures that once you’re ready to roll, everything from the rice to the fillings is perfectly in place, allowing you to create beautiful sushi without the usual hassle and mess.
Step-by-Step Guide:
Step 1: Size Your Baking Paper
Prepare Your Paper: Start by sizing your baking paper to match the nori sheets you plan to use. If you’re using half a nori sheet, cut your baking paper to the same size. This ensures that your sushi rice will fit perfectly on the nori without any overhangs or shortages, creating the ideal base for your rolls.

Step 2: Prepare Multiple Sheets
Ready Your Supplies: Depending on how many rolls you intend to make, prepare the same number of baking paper sheets. Having all your sheets cut and ready streamlines the process, allowing you to maintain a steady workflow without interruptions for cutting more paper.
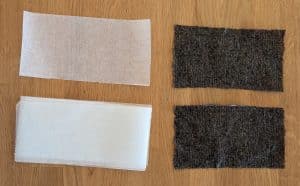
Step 3: Apply the Sushi Rice
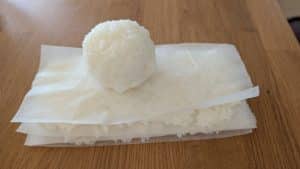
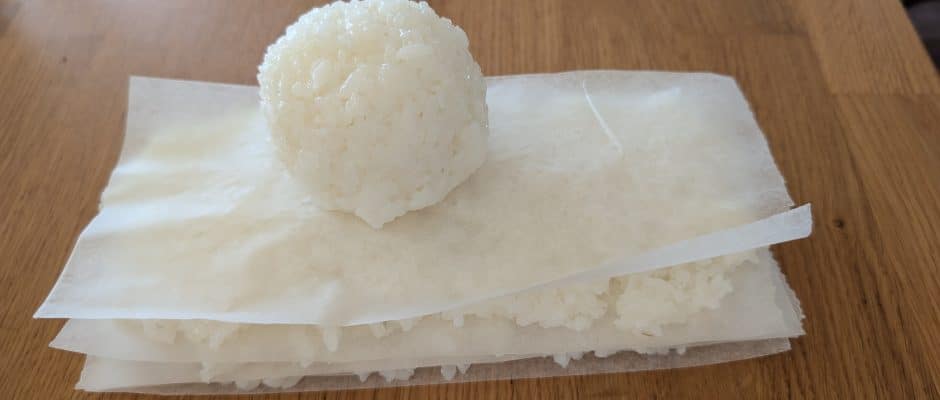
Layer the Rice: Evenly spread the sushi rice over each sheet of baking paper. Use just enough rice to cover the paper, which should be the right amount for each roll. This step is crucial for achieving uniformity in your sushi rolls, ensuring each bite is as good as the last.

Step 4: Stack and Store
Organize for Efficiency: Once each baking paper sheet is covered with rice, stack them on top of each other. This method not only saves space but also keeps the rice sheets ready to be used. You can easily access the rice sheets one by one as you assemble your sushi rolls, keeping the process neat and orderly.
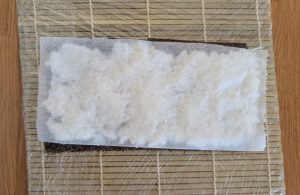
Step 5: Transfer the Rice
Flip and Align: Carefully flip the rice-covered baking paper onto your sheet of nori. Ensure the rice is evenly aligned with the edges of the nori for a perfect roll. This step helps in creating a seamless layer of rice, essential for well-formed sushi.
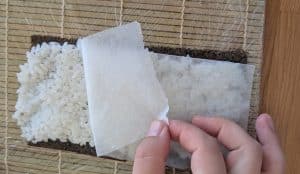
Step 6: Peel Away the Paper
Reveal the Rice Layer: Gently peel off the baking paper from the rice. This should leave a beautifully even layer of sushi rice on the nori. The non-stick nature of baking paper makes this step satisfyingly simple, maintaining the integrity of your rice layer without any sticking.
Step 7: Ready to Roll!
Efficient Rolling: With your nori now perfectly covered with rice, you’re ready to add your fillings and roll. What typically takes 1-2 minutes of spreading rice and cleaning sticky hands, you’ve completed in just about 3 seconds using this method. This not only makes the sushi-making process cleaner but also significantly faster, allowing you more time to enjoy your creations.
Conclusion: Effortless Sushi Rice Application
Enjoy the Simplicity: With the rice now perfectly covering the nori, you’ve achieved a clean, uniform base for your sushi roll in just seconds—and your hands are still clean! This technique significantly reduces the mess typically associated with sushi making, allowing you to enjoy the process and the eating all the more.
This approach not only enhances the efficiency of making sushi at home but also makes the process more enjoyable by minimizing cleanup and preparation time.

Incredible idea! I added a little twist by sprinkling some sesame seeds on the rice before flipping it onto the nori. Turned out great and added an extra touch!
Do you have any suggestions for rice that’s a bit stickier than usual? I tried your method, and while it helped a lot, I’m still struggling a bit with the rice sticking to the paper.
I was skeptical at first, but the baking paper method really works! It saved me so much time and hassle. This is going to be my go-to method from now on.