

Cutting fish for sushi is all about precision, the right tools, and proper techniques. Here’s what you need to know to get started:
- Key Tools: Use a Yanagiba knife for clean, smooth cuts, and a Deba knife for heavy-duty tasks like breaking down whole fish. A wooden or high-density plastic cutting board is ideal for maintaining knife sharpness.
- Knife Care: Keep your knives sharp and clean. Always hand-wash, dry immediately, and store safely. Regular honing and occasional sharpening with a whetstone are essential.
- Fish Preparation: Choose fresh, sushi-grade fish. Look for clear eyes, firm flesh, and a mild ocean smell. Remove excess moisture, pinbones, and trim dark or fatty areas before cutting.
- Cutting Techniques:
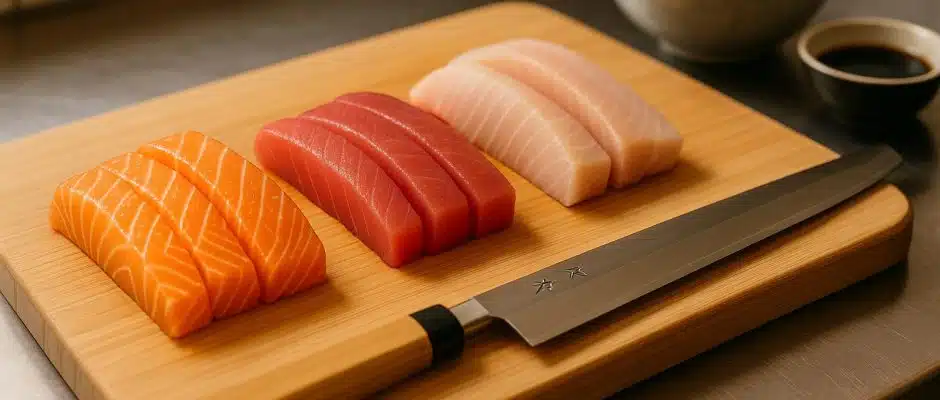
- Nigiri: Slices should be 1.5 inches wide, 3–4 inches long, and ¼ inch thick, cut at a 45° angle.
- Sashimi: Use techniques like hirazukuri (rectangular slices) or sogigiri (thin diagonal cuts), always cutting against the grain.
- Maki Rolls: Cut fish into ¾-inch square strips, 8 inches long, for even distribution in rolls.
- Avoid Mistakes: Use a sharp knife to prevent tearing, maintain a steady angle for even slices, and clean your blade frequently to avoid fish sticking.
Mastering these basics will improve your sushi-making skills and enhance the taste and presentation of your dishes. Ready to dive in? Let’s get cutting!
How To Slice Fish For Sushi and Sashimi
Tools You Need for Sushi Fish Preparation
Mastering sushi preparation starts with having the right tools. Specialized equipment can make all the difference in achieving those precise, professional cuts essential for sushi and sashimi.
The Yanagiba Knife Explained
The Yanagiba (柳刃包丁) is the go-to knife for slicing raw fish in sushi and sashimi preparation. Its single-bevel blade is designed to deliver ultra-sharp, clean cuts while minimizing damage to the delicate fish cells. This precision is key to creating the smooth, glass-like slices that sushi demands.
Typically, the Yanagiba measures anywhere from 8.3 to 14.2 inches (210–360 mm), with a 10.6-inch (270 mm) blade being a popular choice for home sushi enthusiasts. Prices vary widely, starting around $50 for models like the Kai Seki Magoroku Kinju AK-1106 240 mm, and climbing to approximately $280 for high-end artisanal versions. Left-handed chefs should look for specially crafted left-handed Yanagiba knives to ensure proper blade alignment.
"The yanagiba knife is the life-blood of Japanese fish preparation. This knife helps you create pristine, glass-like cuts that professional-quality sushi demands." – Yakushi Knives
Other Tools: Deba Knife and Cutting Board
While the Yanagiba excels at slicing, other tools play vital roles in sushi preparation. The Deba knife is perfect for heavier tasks like breaking down whole fish, removing heads, and cutting through bones. Alongside the Yanagiba and Usuba knives, the Deba is considered one of the foundational tools in Japanese cuisine.
For your cutting surface, choose a wooden cutting board for its gentle, self-healing properties and natural antimicrobial benefits. Alternatively, a high-density plastic cutting board offers easy cleaning and sanitation. Whichever you choose, dedicating a board exclusively to fish preparation helps prevent cross-contamination and protects the blade’s sharpness.
Blade Care and Cleaning
Proper care of your knives is critical for both safety and performance. After each use, rinse the blade under warm water, then clean it with mild soap and a soft cloth. Always wipe from the back of the blade toward the edge to avoid dulling it. Never put Japanese knives in the dishwasher – harsh detergents and high heat can damage both the blade and handle.
Dry your knives immediately to prevent rust, and if your knife has a wooden handle, apply food-safe mineral oil to keep it in good condition. During longer cutting sessions, keep a damp cloth nearby to wipe away fish residue, ensuring clean and precise cuts throughout.
When not in use, store your knives properly – whether in a knife block, on a magnetic strip, or in individual knife covers – to avoid damage and accidents. Regular honing with a honing rod will keep the blade aligned between uses, while occasional sharpening with a whetstone (set to a 15–20 degree angle) will maintain the razor-sharp edge essential for sushi preparation. Proper maintenance ensures your tools are always ready to perform at their best.
How to Choose and Prepare Sushi-Grade Fish
Picking the right fish for sushi is crucial. Since the term "sushi-grade" isn’t officially regulated, you’ll need to confirm the quality yourself. Using your senses is a reliable way to judge freshness.
Signs of Fresh Fish
Your senses are your best guide when it comes to spotting fresh fish. Look for a mild, clean, ocean-like smell – anything too fishy is a red flag. If you’re buying a whole fish, its eyes should be clear and shiny, not cloudy or dull. The flesh should be vibrant in color, firm to the touch, and spring back when pressed. Avoid fish with any discoloration.
Labels like "sushi" or "sashimi" can indicate the fish is intended for raw consumption, but don’t stop there. Ask your fishmonger about where the fish came from and how it was handled. This extra step ensures you’re getting a safe and high-quality product.
Getting Fish Ready for Cutting
Once you’ve bought your fish, it’s best to prepare it right away. Ideally, use it the same day or within two days. Keep it on ice and refrigerate as soon as you get home. Before cutting, rinse the fish under cold water and pat it dry with paper towels. Removing excess moisture is key for both flavor and food safety. As Yuji Haraguchi explains:
"Taking the moisture out is sanitary, and it makes the fish more flavorful… a lot of people make the mistake of packing fish right after it’s filleted, and there’s a lot of moisture still left, whether it’s from the fish or from the water used to clean the fish."
After drying, check for pinbones and remove them with clean tweezers. Trim off any dark or fatty areas to create a clean, uniform piece of fish. Throughout the process, handle the fish as little as possible to avoid bacterial contamination. Make sure your workspace, tools, and hands are spotless. If you’re switching between different types of fish, sanitize your cutting board or flip it to a clean side.
Freezing for Better Cuts
Freezing fish serves two key purposes: it kills parasites and can improve texture. The FDA recommends freezing fish at -4°F (-20°C) or colder for at least 7 days to make it safe for raw consumption. Many top sushi restaurants rely on frozen fish to manage parasite risks without compromising flavor. As Davis Herron, director of the retail division at The Lobster Place, explains:
"Any wild fish except tuna species – bigeye, yellowfin, bluefin, bonito/skipjack – those wild fish need to be frozen for specific periods of time at specific temperatures to get rid of parasites."
However, home freezers typically only reach 0°F (-18°C), which is below FDA standards and can lead to large ice crystals that damage the fish’s texture. When thawing, remove the fish from vacuum packaging once it starts to soften. Wrap it in paper towels and let it finish thawing in the refrigerator.
Step-by-Step Guide to Cutting Fish for Sushi
Once your fish is prepped, it’s time to focus on the cutting techniques. Each type of sushi demands a specific approach, and nailing these cuts is crucial for both presentation and taste. Proper hand positioning and precision will make all the difference.
Cutting for Nigiri
Nigiri calls for the most accuracy since the fish slice is the star, sitting prominently atop the rice. Begin by rinsing the fish and patting it completely dry with paper towels. Careful planning of your cuts can also help minimize waste.
If you’re working with salmon, remove any outer brown layer for a cleaner appearance. The belly portion is particularly prized for its rich flavor and appealing look. Hold your knife at a 45-degree angle to the fillet and aim for slices about 1.5 inches wide, 3–4 inches long, and roughly ¼ inch thick. This angled cut ensures the perfect proportions for nigiri.
Use your non-dominant hand to support the fish as you cut. Pull the knife toward you in one smooth motion – avoid sawing back and forth. For salmon, thin slices (around 1/8 inch thick) cut at a 45-degree angle across the grain will reduce stringiness and ensure a tender bite.
Next, let’s look at how to adapt your slicing for sashimi.
Cutting for Sashimi
Sashimi cutting is all about highlighting the fish’s natural texture and flavor with clean, precise slices. Always cut perpendicular to the grain to avoid any stringiness. Chef Masaharu Morimoto offers this advice:
"Using a sharp long knife, cut the fish against the grain into thin, even pieces."
There are two key techniques for sashimi: hirazukuri and sogigiri.
- Hirazukuri is the standard rectangular slice used for most sashimi. For softer fish like tuna, aim for slices about 7–10mm thick. Use the same smooth pulling motion as with nigiri to achieve a clean cut.
- Sogigiri, or the "shaving cut", is ideal for firmer fish like snapper. This method produces thinner, diagonal slices that better complement the texture of white fish.
In both techniques, cutting against the grain is essential to break down connective tissues, resulting in a more tender bite. Keep your knife strokes smooth and continuous, and ensure the fish stays dry for the best results.
Now, let’s move on to cutting fish for maki rolls.
Preparing Strips for Maki Rolls
Cutting fish for maki rolls is more straightforward than for nigiri or sashimi. Since the fish will be wrapped in rice and nori, achieving perfect slices is less important than maintaining consistent size.
Aim for strips with a cross-section of about ¾ inch by ¾ inch and a length of 8 inches. These dimensions ensure the fish fits neatly inside the roll without causing unevenness. You can also use leftover scraps from your nigiri cuts as filling. Simply slice the fish into uniform strips that match these measurements for even distribution.
This method is more forgiving since the fish isn’t the visual centerpiece of the dish, but consistency is still key for a balanced roll.
sbb-itb-7b591fe
Common Mistakes and How to Avoid Them
Even with the right approach, beginners often face a few stumbling blocks when preparing sushi. These challenges usually pop up early on, but knowing what to watch out for can help you improve faster. Let’s dive into three common mistakes and how to address them.
Uneven Slices
One of the most frequent issues is inconsistent slice thickness. You might end up with one piece that’s paper-thin and another that’s thick and clunky. This often happens when the knife angle changes mid-cut or when pressure isn’t evenly applied. To fix this, focus on maintaining a steady knife angle and applying consistent pressure throughout each cut.
"The key to cutting sashimi is to keep the fish cells intact as much as possible."
Start by practicing your cutting motion without any fish – this helps build the muscle memory for smooth, uniform slices. Use your non-dominant hand to guide the fish gently, avoiding a tight grip. This technique not only improves your slicing but also enhances the overall sushi-making experience.
Torn Flesh
Another challenge is torn fish flesh, which often results from using a dull knife or cutting with the grain instead of against it. As Outfit4Events points out:
"The key to good sushi is quality ingredients, especially the right type of rice… Another essential ingredient of success in sushi preparation is a sharp sushi knife."
To avoid tearing, ensure your knife is sharp and use smooth, continuous strokes from the base to the tip of the blade. Avoid a sawing motion, as this can crush and tear the delicate fish tissue. Let the knife’s sharpness do the work, applying only minimal pressure. If your cuts start to look ragged, take a moment to hone your blade. A sharp knife not only makes cutting easier but also preserves the fish’s texture and appearance.
Fish Sticking to the Blade
Fish sticking to your knife can disrupt your slicing flow. This often happens as the blade warms up or accumulates residue during use. To reduce friction, dip the blade in cold water between cuts. Keeping a bowl of cold water nearby for quick dips can make a big difference.
Another helpful trick is to wipe the blade with a wet towel between slices to remove residue. For particularly stubborn buildup, rubbing a thin slice of daikon or ginger on the blade works well. You can also apply a very light coating of olive oil, but use it sparingly to avoid altering the fish’s flavor. Regularly cleaning the blade by dipping it in water after each cut prevents buildup and keeps the slicing process smooth. These small adjustments can go a long way in refining your technique and improving your sushi-making skills.
Plating and Presentation Tips for Sushi
Once you’ve mastered your cutting techniques, it’s time to focus on presentation – an essential part of sushi-making that turns a delicious dish into a feast for the eyes. The concept of moritsuke emphasizes that how food looks is just as important as how it tastes. As zenDine puts it:
"In Japanese culture, food presentation is considered an essential component of their cuisine, and is believed to be just as important as the taste and quality of the food."
Balancing traditional and modern plating techniques allows you to showcase your sushi in a way that respects its origins while adding your own flair. Presentation ties together the precision of cutting and the joy of eating, completing the art of sushi-making.
Classic Plating Techniques
Traditional plating focuses on simplicity, balance, and natural appeal. Odd-numbered arrangements – such as three, five, or seven pieces – are a hallmark of this style, offering visual harmony.
For sashimi, arrange slices with the larger cut facing forward, highlighting the fish’s texture and marbling. Use about one-third of the plate’s surface to avoid overcrowding and let the ingredients shine. Garnishes like tsuma (shredded daikon) and shiso leaves not only add height but also refresh the palate.
When plating nigiri, aim for contrast. Group pieces with complementary colors and arrange larger items in the center, surrounded by smaller ones. Condiments follow specific rules: place wasabi and other accompaniments at the front right of the plate, and always serve pickled ginger separately.
Modern Presentation Ideas
Modern plating takes a more artistic approach, using negative space and creative layering to make sushi visually striking.
Minimalist plates in dark tones can make the vibrant colors of fresh fish pop. Add dimension by layering ingredients – think edible nests, cucumber ribbons, or small stands to create varied heights. Incorporate microgreens, edible flowers, or even gold leaf for an elegant touch. For texture, try cucumber roses or crispy nori accents.
Asymmetry is another hallmark of modern plating. Instead of centering everything, arrange sushi pieces in flowing, organic patterns that guide the eye naturally across the plate. This approach feels dynamic and less rigid, adding a contemporary flair.
The secret to modern plating is knowing when to stop. Every element should have a purpose – whether it’s enhancing the look, texture, or flavor. Whether you lean toward classic or modern styles, the ultimate goal is the same: crafting a dining experience that celebrates both the artistry and taste of sushi.
Conclusion: Improving Your Sushi-Making Skills
Mastering sushi-making starts with precision and practice. As Chef Yoshi Okai wisely points out, "You always have to do it in one smooth stroke… You can really taste the difference if you’re doing a ton of cuts, you can feel the jagged edges in your mouth." This highlights the importance of honing proper knife techniques, as it directly impacts the quality of your sushi.
Begin with the basics – simple cuts – and gradually work your way toward crafting nigiri and sashimi. Even seasoned sushi chefs spend years perfecting their skills, so take it slow and relish the process. Learning is part of the journey, and each step brings you closer to mastering the art.
Investing in a sharp, high-quality knife is a game changer. As noted in the guide, "The sharper the knife, the easier the whole process will be." – Craftycookbook.com A well-maintained blade not only makes cutting smoother but also enhances your overall experience, turning what could be a chore into a joy.
Repetition is key. Practicing basic cuts helps develop muscle memory, making proper angles, pressure, and motion feel natural over time. With consistent effort, you’ll notice your technique becoming more fluid and confident.
Don’t stress about perfection – progress is what matters. Even your early attempts will be delicious, and the satisfaction of creating sushi with your own hands is unmatched. The beauty of home sushi-making lies in the combination of effort, creativity, and flavor.
FAQs
What’s the difference between a Yanagiba knife and a Deba knife, and when should you use each for sushi?
The Yanagiba knife is a long, narrow blade with a single-beveled edge, crafted for incredibly precise, clean cuts. It’s the go-to tool for slicing sashimi and sushi, as its design allows it to glide effortlessly through fish without causing any tearing. This makes it perfect for delicate tasks like preparing Nigiri or Sashimi, where precision is everything.
In contrast, the Deba knife features a thicker, more robust blade with a double bevel. It’s built for tougher jobs, such as filleting whole fish or cutting through small bones with ease. Think of the Yanagiba as your precision tool for slicing, while the Deba is your workhorse for breaking down or filleting fish before you start crafting sushi. Together, these knives are key to mastering sushi preparation in your own kitchen.
How can I make sure the fish I buy is safe and sushi-grade?
When shopping for fish suitable for sushi, keep an eye out for labels like sushi-grade or sashimi-grade. These terms indicate that the fish has been properly handled and frozen to eliminate parasites. In the U.S., guidelines suggest freezing fish at -4°F for at least 7 days or -31°F for 15 hours to ensure safety.
Make sure the fish is fresh by checking for bright, clear eyes, shiny skin, and a firm texture. To ensure quality and safety, always buy from a reputable source that specializes in sushi-grade fish.
What are the most common mistakes when cutting fish for sushi, and how can I avoid them?
When you’re just starting out with cutting fish for sushi, it’s easy to stumble over a few common mistakes. But don’t worry – these are simple to fix with the right techniques.
One big misstep is using a dull knife. A blunt blade can crush the fish, leaving you with uneven, messy slices. To avoid this, always opt for a sharp knife, like a Yanagiba, and make sure to keep it in top shape for those clean, precise cuts.
Another frequent error is cutting against the grain of the fish. Doing this can cause the fish to tear and mess up its texture. Instead, take a moment to identify the grain and slice with it to achieve smooth, even pieces.
Lastly, always ensure your fish is sushi-grade and properly chilled before you start cutting. This step not only guarantees safety and better flavor but also makes the fish much easier to handle. Follow these pointers, and you’ll be on your way to mastering sushi slicing in no time!
No comments yet.